TransDEM Forum

TransDEM News, Support, Hints and Resources
It is currently 19 Mar 2024 06:27

All times are UTC + 1 hour


Post new topic Reply to topic  [ 8 posts ] 
Author Message
PostPosted: 01 Feb 2011 20:09 
Offline

Joined: 05 Jan 2011 16:45
Posts: 1459
Requires TransDEM 2.1.2 or higher.

British Ordnance Survey offers a variety of map data with their Open Data initiative: http://www.ordnancesurvey.co.uk/oswebsite/opendata/

Among them is OS VectorMap™ District, a vector map at a nominal scale of 1:25000. We will abbreviate it to VMD.

Data is packed into tiles of 10 x 10 km and structured by O/S 100 x 100 km grid squares. To find the grid square, an overview map should be loaded in TransDEM and the coordinate system switched to OSGB36. Grid square codes are shown in the TransDEM status bar, if the View | Show grid square option is activated. The numerical digits in the file name indicate the 10 km tile in square coordinates, the first digit for the easting, the second digit for the northing.

The following is an example on processing this data. We will look at an area in the Pennines, Lancashire and West Yorkshire, which I have used before. It's the home of the Rochdale and the Leeds & Liverpool canals. We will find railways, too, but I may be a bit distracted here, when dealing with this part of England.

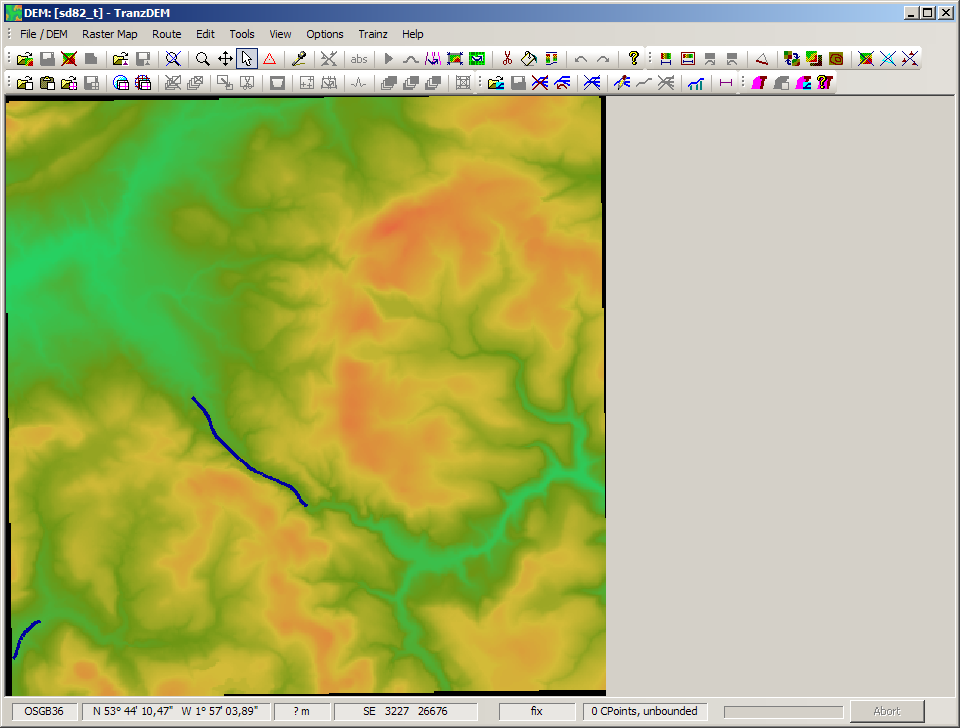
  1. We start with the DEM and picked O/S Land-form Panorama square SD82 for this.

    Image

    Note the TransDEM status bar: Coordinate system set to OSGB36, Grid square display on: "SD".

    What we look at are the River Calder valleys, Todmorden in the south east, Burnley in the north west.
  2. Download the VMD map in vector format (ESRI Shape) for the SD square and unpack.
  3. As the grid size for VMD is 10 km we will need four squares to fill this DEM, actually only three as we will concentrate on the railway which will not be present in the north east quadrant.

    We start with SD82 for the south west quadrant. You will find it in your folder where you unpacked the data:
    ....\vmdvec_sd\OS VectorMap District (Vector) SD\data\SD\SD82

    There are a number of layers. We will confine on railways and polylines. This layer is named "Railway_Line".

    In TransDEM click Route | Open Route... and change the format to ESRI Shape.

    Image

    Select Railway_Line.shp and click OK.
  4. TransDEM will pop-up a confirmation box to convert coordinates. VMD data is in ESRI shape format, however, coordinates are non-standard OSGB36. The shape format has no means to carry such non-standard information in its files. Therefore it is important to have switched to OSGB36 coordinates in TransDEM before opening the file, see above.
    Image

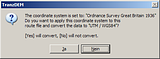
    Click "Yes" in this box.
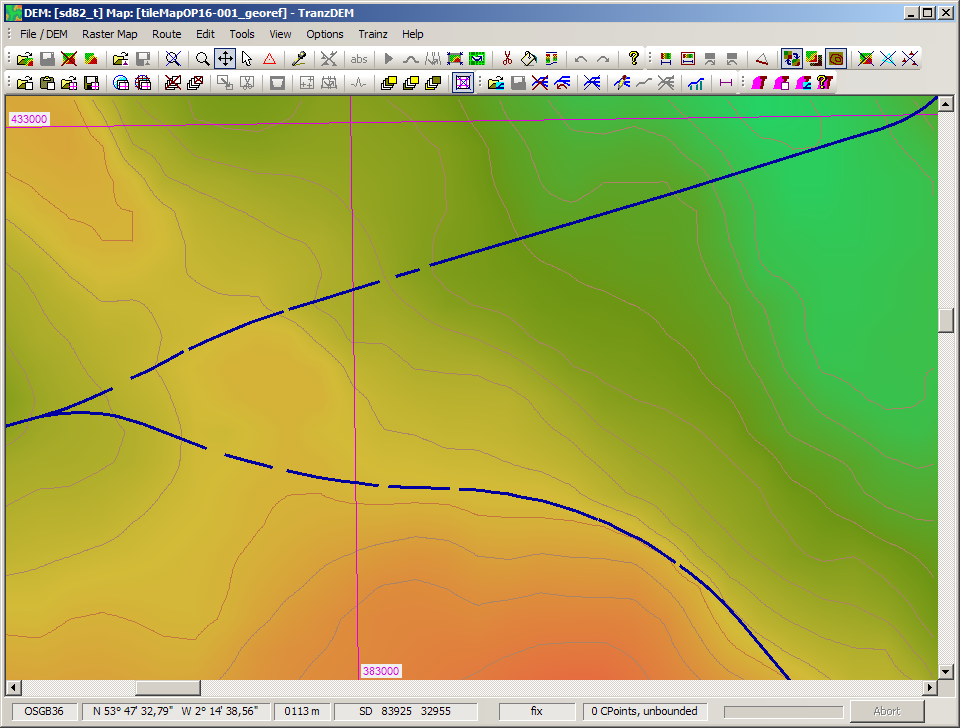
  5. TransDEM will read the vectors and display them:

    Image

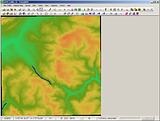
    The data is now in UTM/WGS84 coordinates, converted from OSGB36. Because of the conversion TransDEM treats this data as edited and requires you to save the data to retain the conversion.

    Click on Route | Save Route... . Choose the format you like. Default .str will be fine.
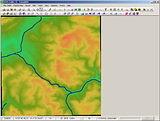
  6. Repeat loading for squares SD92 and SD83 and Railway_Line.shp in those folders. Reply "yes" to the conversion question and then save each file.

    When all three files have been loaded and individually saved, your picture will like this:

    Image
  7. Now, save once again, this time select Route | Save Route as... . This will combine the three route files loaded to a single file, convenient for future use.
  8. That's it.


Looking closer at the vector data we notice a number of gaps:

Image

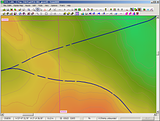
At first glance it looks like a quality issue, but it is not. The purpose of this vectors is to provide the data for drawing a map, not for navigating track.

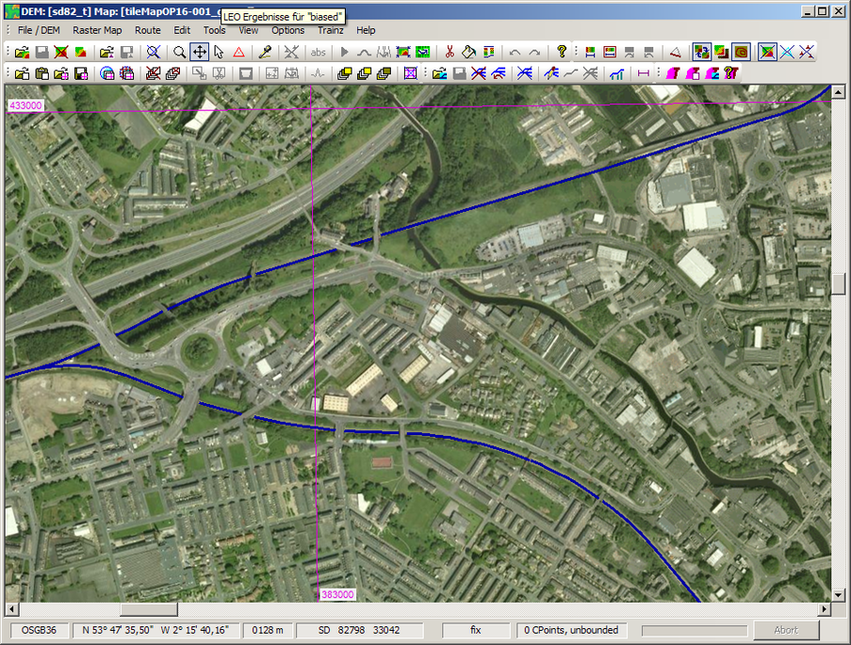
Adding an ortho image reveals the nature of the gaps: overbridges.

Image

Quite helpful, when working on the route in Trainz Surveyor later.


The picture also shows the Leeds & Liverpool Canal meandering on its way through Burnley with the modern times motorway aqueduct at the top edge. At the other end of town you would find the Burnley Embankment, one the engineering marvels of the Canal Age.


Top
 Profile  
 
PostPosted: 09 Feb 2011 23:02 
Offline

Joined: 27 Jan 2011 20:57
Posts: 41
Hi geophil.

Having upgraded my TransDEM, to 2.1.2, I abandoned my route and started again using the O/S track vectors. What an improvement it's made over hand drawing a route. Thanks for the update.

One problem I have encountered however, is that when I try to acquire maptiles for the route, I get a message telling me the 'Path is too Complex'. I've found that I can do a work around by using a manually added simple route but it does entail a lot of extra work.

It's still a fantastic piece of software though..

PFX


Top
 Profile  
 
PostPosted: 10 Feb 2011 12:10 
Offline

Joined: 30 Jan 2011 13:03
Posts: 170
G'day PFA72,

You will also find that you can 'work around' the "too complex" issue by 'editing' the 'complex' route, dividing it into smaller portions (with a little overlap) and getting the maps in 'bits' along these portions as you are now...

Jerker {:)}


Top
 Profile  
 
PostPosted: 10 Feb 2011 14:06 
Offline

Joined: 05 Jan 2011 16:45
Posts: 1459
In this case I assume it may have to do with the numerous gaps in the vectors. This makes the vector data overly complex for the purpose of acquiring map clippings along a path.

I suggest to simply draw a few strokes which roughly resemble the course of the line, for setting the path to access the Map Tile server.

Use an extra layer for this by opening the TransDEM Simple Route Editor with the "Simple Route Editor, New Route" command or Ctrl+Shift+E (not on the toolbar).


Top
 Profile  
 
PostPosted: 11 Feb 2011 21:14 
Offline

Joined: 27 Jan 2011 20:57
Posts: 41
I did just that and success. Thanks again geophil.


Top
 Profile  
 
PostPosted: 27 Dec 2013 12:44 
Offline

Joined: 27 Dec 2013 11:04
Posts: 5
I found this tutorial interesting after finding the OS web site. I have used the Landform data to produce an elevation image. I then used the Vector Map data to place rail track. For the rest of the detail, roads, rivers, etc. I scanned a Landranger map and added the raster image, after georeferencing it. However, after adding the raster image, the track and elevation data do not line up with the raster image. Is there any way of establishing a reference position on the elevation and track image which could be used to establish a similar position on the raster image?


Top
 Profile  
 
PostPosted: 27 Dec 2013 14:14 
Offline

Joined: 05 Jan 2011 16:45
Posts: 1459
Apparently something went wrong with geo-referencing. You probably used the 3+1 point method. Coordinates on O/S maps are OSGB36, but TransDEM uses UTM/WGS84. That includes geographic coordinates, i.e. latitude and longitude. N56° W003° for instance would point to different locations in OSGB36 or UTM/WGS84, probably around 150m apart.

The easiest way to obtain pre-georeferenced O/S Landranger and Explorer maps for TransDEM is the Microsoft Map Tile service, called by its original name "MS Virtual Earth" in TransDEM. Select Tile Type "Other 1". Zoom levels up to 14 produce the 1:50,000 Landranger map, zoom level 15 and higher the 1:25,000 Explorer map.


Top
 Profile  
 
PostPosted: 28 Dec 2013 12:23 
Offline

Joined: 27 Dec 2013 11:04
Posts: 5
Thanks Geophil. You were right, I had entered the wrong co-ordinates during georeferencing. With the correct values the difference was a few metres. I must have a look at the Map Tile service.

EddiePrice


Top
 Profile  
 
Display posts from previous:  Sort by  
Post new topic Reply to topic  [ 8 posts ] 

All times are UTC + 1 hour


Who is online

Users browsing this forum: No registered users and 2 guests


You cannot post new topics in this forum
You cannot reply to topics in this forum
You cannot edit your posts in this forum
You cannot delete your posts in this forum

Search for:
Jump to:  

Imprint & Privacy

Powered by phpBB® Forum Software © phpBB Group